
FINISHED SIZE
12" wide x 16 1/2" high x 4 1/2" deep
MATERIALS
Amounts are based on 42"-wide fabric.
1 yard for bag exterior (optional: 2 fabrics pieced together for the front) 1/4 yard for pocket or individual pouch
1 1/4 yards for lining
3/4" (18mm) magnetic snap (optional)
5" of narrow elastic for button closure
2 buttons, 1" diameter
NOTE
You can follow the instructions for the pocket to make an individual pouch.
NOTE
- A 3/8" seam allowance is included on the pattern.
- Backstitch at the beginning and end of each seam.
CUTTING
Transfer all points and reference marks to the fabric. Cut out the exterior, pocket, and lining. Use the Market Bag Front and Back, Pocket Front and Back, and Pocket Flap pattern.
Draw the pattern directly onto the wrong side of a single layer of fabric. Transfer all points and reference marks to the fabric. Cut out the exterior, lining, and interfacing.
Exterior
- 2 Front and Back pieces
- 2 Pocket Front and Back pieces
- 1 Pocket Flap piece Lining
- 2 Front and Back pieces
- 2 Pocket Front and Back pieces
- 1 Pocket Flap piece
Sewing the Exterior and Lining
1. Place the front and back pieces with right sides together, pin both sides, and stitch. Pin the bottom and stitch together, FIGURE A
2. Match the side and bottom seams with right sides together. Pin in place and stitch. Repeat this process for the other side, FIGURE В


4. Sew the lining pieces together like Steps 1 and 2 above. Leave a 6" opening for turning.
Assembling the Exterior and Lining
1. Turn the exterior right side out and tuck it into the lining with right sides together, FIGURE D
2. Pin the exterior and lining pieces together at the curved seam from the top of a handle to the top of the other handle. Sew, leaving the top 2" of the handles unsewn. Then pin each of the remaining curves and sew in the same manner, FIGURE E

3. Clip the inside corner seam allowances and trim the corner seams, FIGURE F

4. Turn the bag right side out through the bottom opening. Sew the opening closed.
Constructing the Handle
1. Tuck the lining into the exterior. Place the exterior handles with right sides together. Pin and sew together along the short edges. Press the seam open. Repeat this process for the lining, FIGURE G
2. Tuck in the raw edges of the seam allowances on both sides of the straps and press, FIGURE H

3. Pin or baste the strap opening. Topstitch 1/8'' away from the seam around the armhole of the bag. Topstitch the other armhole and the main opening of the bag. FIGURE I

Making the Pocket or Pouch
Making the Front and Back
1. Place the front and back pieces with right sides together. Sew around the exterior front and back. Clip the curves, FIGURE J
2. Repeat this process for the lining.
Making the Flap
1. Place the elastic loop onto the exterior flap, facing in, and baste in place, FIGURE К
2. Pin the exterior flap and lining flap with right sides facing. Stitch only the rounded seam, leaving a straight edge unstitched for turning. Clip the curved seam, FIGURE L

3. Turn the flap right side out. Press the flap; topstitch 1/4'' away from the curved seam only, FIGURE M

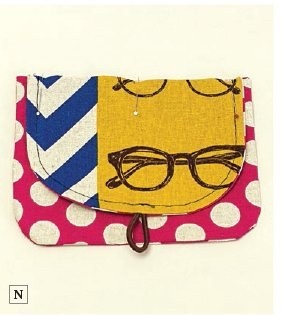
4. Place the flap onto the back of the pocket exterior with exterior sides facing, aligning the raw edge of the pocket and the flap. Pin and baste the flap to the pocket, FIGURE N

Assembling the Pocket Exterior and Lining
1. Press the exterior and lining seams open. Put the exterior into the lining with right sides together, sandwiching the flap between the exterior and the lining, FIGURE О
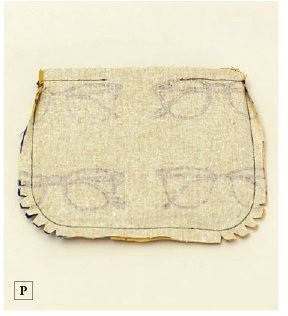
2. Pin the opening of the pocket. Sew along the opening of the pocket using a 3/8" seam allowance, leaving a 3" gap to turn it right side out. FIGURE P

3. Trim the corner seams. Turn the pocket right side out. Iron the opening of the pocket. Tuck the lining into the exterior. Topstitch all around the opening of the pocket, FIGURE Q

4. Turn the pocket inside out and sew the button to the lining front. Turn the pocket right side out and sew the optional second button to the front.
5. Attach the pocket onto the bag 4" down from the center top. Pin in place and stitch together at the top of the back, FIGURE R

Folding the Bag
1. Fold the sides toward the center, beneath the pocket, FIGURE S
2. Flip the bag on its back. Fold the handles and the bottom up toward the center, FIGURE T

3. Turn the pocket inside out while inserting the bag into the pocket, FIGURE U

4. Hook the elastic around the button, FIGURE V


This could be a great pattern. It looks cute and is the perfect bag for shopping. Unfortunately, when you print it from the provided jpg files, the gauge is off. None of the pages are sized the same. You need to resize them to make the 1 inch gauge correct. Once you do that, the pattern goes together pretty easily. The final dimensions are closer to 18" wide and 25" long including the handle.
ReplyDeleteNearly 3 years later and I have to agree with wmwd27. printing from jpg files is VERY inaccurate. even the cross hatch 1" measurements are not these. Can this be fixed
ReplyDeleteI resized all the pieces to the correct gauge and made a .pdf that uses half the sheets of paper in the process. If you are interested (or anyone else for that matter) want the fixed copy, send me an email and I'll send it to you.
Delete