And just for good measure, since we’re already doing all that cutting and sewing, we might as well make it a double rainbow–one block for you and one for a good quilt-y friend.Fat Quarter Shop
Although this block is all straight lines and half-square triangles, it does require a bit of extra attention to accuracy. If your 1/4″ seam is off by just 1/32″, you probably won’t notice much of a problem after one or two seams. It only takes eight seams however, each being off by 1/32″ to create a 1/4″ difference between a pieced unit and a single cut of fabric. So consider this block good 1/4″ accuracy practice.

spool-along block 10
Makes 2 blocksBlock size 6-1/2″ x 12-1/2″
(6″ x 12″ finished)
Cut the following:
background fabric
(1) 3-1/2″ x 14″ strip
(4) 1-1/2″ x 7-1/2″ strips
(1) 4″ x 4″ square
spool fabric
(4) 1-1/2″ x 4-1/2″ rectangles
(1) 4″ x 4″ square
thread fabric
(7) different 1-1/2″ x 10″ strips
Instructions:
(all seams are 1/4″, sew right sides together)

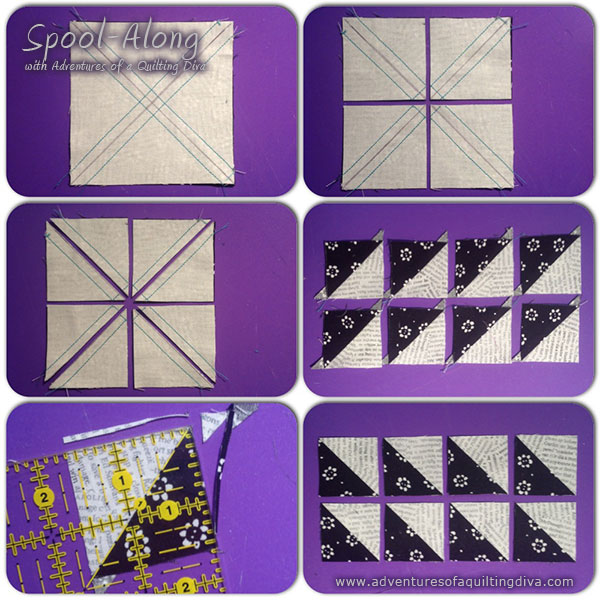
1). On the reverse side of the background fabric square, mark a diagonal line from top left to bottom right corners and from bottom left to top right corners, making an X (gray lines, shown above). Layer the spool fabric square and the background fabric square right sides together. Sew 1/4″ from each side of both diagonal lines (green lines, shown above).
2). Cut sewn 4″ squares down the middle from top to bottom and from left to right to make four 2″ squares. Cut along the diagonal lines to make eight half-square triangle (HST) units. Note: The photos show the cut pieces separated from each other. This is for demonstration of the cuts you will need to make. If you are careful and do not move the fabric between cuts, it will take only four cuts to separate all eight HST units.
3). Press the seam allowances toward the darker spool fabric. Then trim all the HST units down to 1-1/2″ x 1-1/2″ as shown above.

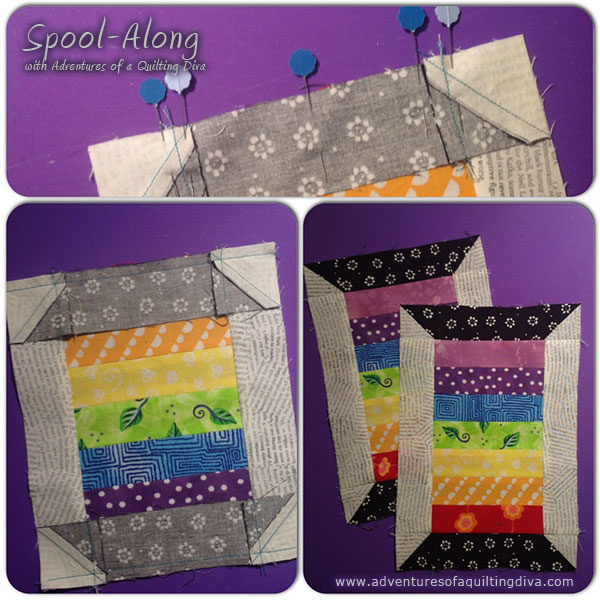
4). Sew a HST unit to each 1-1/2″ side of the four 1-1/2″ x 4-1/2″ rectangles as shown above. Take care to line them up facing the right direction to create the spool shape as shown. Note: It’s easier than you think to turn one the wrong way, so “check twice, sew once.” Press seam allowances towards the center spool fabric rectangle.

5). Arrange the thread fabric strips to your liking, then sew piece #1 to #2, #3 to #4, and #5 to #6. Press seam allowances open or to either side as desired. I like the look of pressed open seams for this part. Then sew unit #1-2 to unit #3-4, and unit #5-6 to piece #7. Press seam allowances open or as desired. Finally sew unit #1-2-3-4 to unit #5-6-7 and press seam allowances open or as desired.
6). Cut unit #1-2-3-4-5-6-7 into two 4-1/2″ x 7-1/2″ thread units as shown above.
7). Sew a 1-1/2″ x 7-1/2″ background fabric strip to each 7-1/2″ side of the thread units. It is helpful to pin generously as the pieced unit tends to stretch differently than the single strip of fabric. Press seam allowances towards the background fabric.

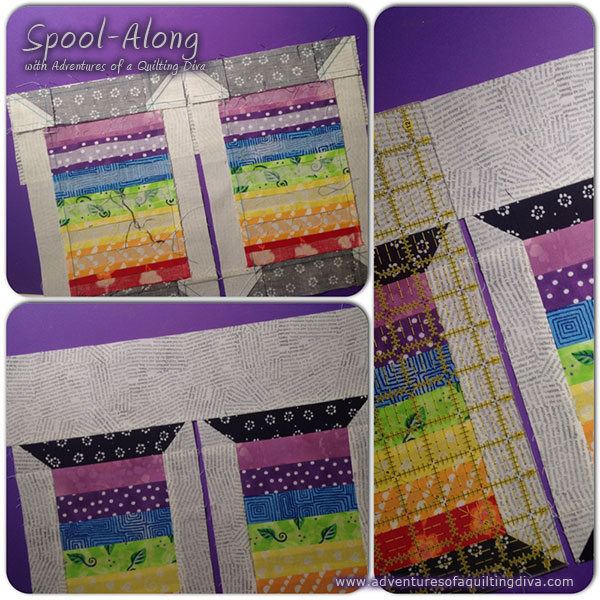
8). Sew a spool-background unit to the top and to the bottom of each of the thread-background units as shown. Nestle the opposing seams together and pin just before and after the seam intersection to hold those corners accurately in place.
Note: Double check for correct placement before sewing these units together. Press seam allowances towards the thread-background unit or as desired.

9). Sew the top of the two spools to the 3-1/2″ x 13-1/2″ strip as shown above. Sew the first spool to the strip. Don’t take the fabric out from your machine, just leave a little space (1/4″ – 1/2″) in between, then line up and sew the next spool to the strip. Press the seam allowances open or as desired, then cut the two blocks apart, trimming them down to their final size of 6-1/2″ x 12-1/2″ each.
Next Tutorials:
Spool Quilt Block Tutorial. Block 1Spool Quilt Block Tutorial. Block 2
Spool Quilt Block Tutorial. Block 3
Spool Quilt Block Tutorial. Block 4
Spool Quilt Block Tutorial. Block 5
Spool Quilt Block Tutorial. Block 6
Spool Quilt Block Tutorial. Block 7
Spool Quilt Block Tutorial. Block 8
Spool Quilt Block Tutorial. Block 9
Spool Quilt Block Tutorial. Block 10 (this page)
Spool Quilt Block Tutorial. Block 11
Spool Quilt Block Tutorial. Block 12


0 comment:
Post a Comment