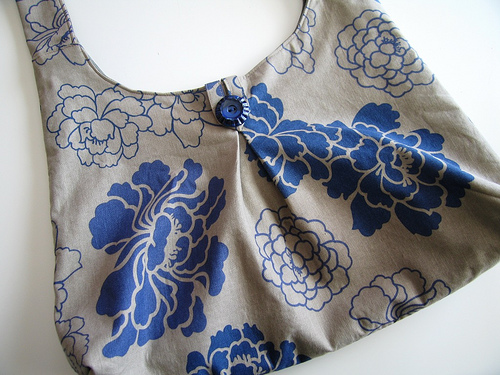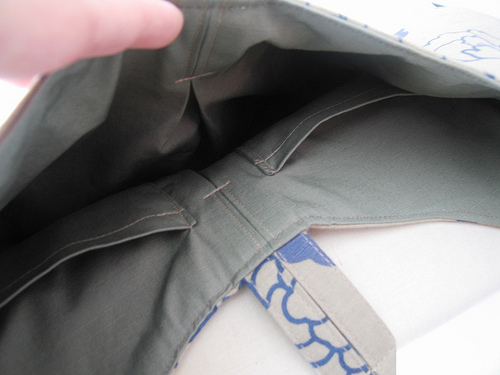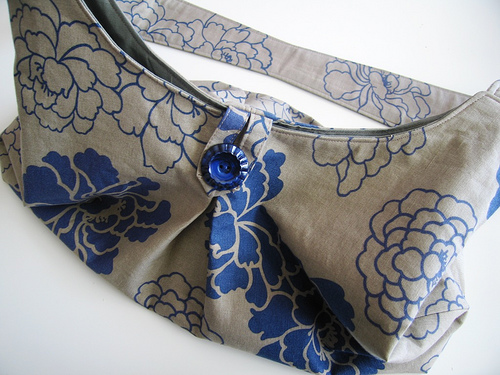

I made a single pleat in both sides of the bag and both sides of the lining to make the bag a little more spacious.

I wasn't sure I would be able to put pockets in the pleated lining, but I ended up adding patch pockets to either side of the pleat on one of the lining panels and was pretty happy with the way they turned out.

I boxed the bottom corners to both give the bag more depth and allow it to stand up on its own. I added lightweight fusible interfacing to the linen blend, since it was very lightweight. The lining is a mid-weight twill and I added a flannel interlining. The bag is a little floppier than I normally like, but I think the floppiness is better for a bag that will be carrying a lot of stuff.

I was also very excited to find a home for this awesome vintage button, which matched the fabric perfectly. I'd never made a fabric button loop like this before, but it's actually pretty cool and holds the bag together nicely.


The bag pattern is larger than 8.5" x 11", so it needs to be printed and pieced together, where indicated. (Once you have it printed and pieced, you may want to trace the pattern pieces onto larger pattern paper or freezer paper for easier use.)
Download PATTERN Bag
This handy sling bag measures approximately 16” wide, 12” tall and 4”deep. The cross-body version shown at left has a 22” drop.
The shoulder bag version shown below has a 15” drop.

Interlining and interfacing make it sturdy and the pleated detail allows the bag to expand to accommodate all your daily essentials.
Unless specified, materials and directions are the same for both views.
Materials:
1.25 yards mid-weight cotton or linen for main fabric/exterior
1.25 yards mid-weight cotton or linen for lining
1.25 yards cotton flannel for interlining
1 - 1.5” button
Thread
For cross-body bag:
3.5 yards 20” wide lightest weight fusible interfacing
For shoulder bag:
4 yards 20” wide lightest weight fusible interfacing
Supplies:
Heavyweight/denim machine needle
Hand sewing needle
Disappearing Ink Marker
Quilting Ruler
Sleeve/mini ironing board (optional)
Cutting Directions:
Use shoulder bag handle for shoulder bag and cross-body handle for cross-body bag.
Main Fabric:
Cut two body pieces on fold. Cut one handle piece on fold. From remaining fabric, cut one 2” x 8” strip for bag closure.
Lining:
Cut two body pieces on fold. Cut one handle piece on fold. From remaining fabric, cut two 5.5” x 11” strips for pockets.
Interlining:
Cut two body pieces on fold. Cut one handle piece on fold.
Interfacing:
Folding the interfacing as necessary, cut four body pieces, two handle pieces and one 2” x 8” strip.
Making the Lining

Repeat the next four steps for both lining panels.
Fold one lining panel in half with right sides together, as shown. Press a crease into the top couple of inches of the fold.

Open the piece back up and use your quilting ruler and disappearing ink marker to draw a line on either side of the pleat. For the cross-body bag, the lines should be 1” from the center crease. For the shoulder bag, they should be 2” from the center crease.

Bring both marked lines to meet the center crease, pressing to create a pleat, as shown.

Use your disappearing ink marker to make a mark 2.5” from the top and 1” across. Starting at the top of the right side of the pleat, stitch from the top edge to the marked line. Pivot and stitch back and forth along the marked line before pivoting again and stitching the other side of the pleat. Finish by stitching across the top of the pleat, securing it in place.

Fold one of your pocket panels in half sides. The folded edge will be the top of the pocket. Use a ¼” seam allowance to sew both sides and the bottom, leaving an open space in the bottom for turning.

Turn the pocket right-side out and side out and press.
Sew a decorative row of stitches across the top.
Repeat the last two steps to complete your second pocket.

Pin both pockets to one of your lining panels. The top corners of your pockets should be 1.5” from the top and 1.5” from the center of the pleat.
Stitch close to the edges of the sides and bottom of both pockets, attaching them to the lining and closing the space you left for turning.

Pockets are attached the same way for both views.
The above photo shows a completed lining panel for the shoulder bag style.

With right sides together and using a 5/8” seam allowance, sew sides and bottom of lining. Leave an approximately 6” opening in one of your side seams, as shown above. Clip corners and press seams open.

Flatten one of your corners to a point, as shown above.
Use your disappearing ink marker to draw a 4” line perpendicular to and 2.5” from the point.
Stitch across that line and trim the point about ½” from the seam.
Repeat with the other corner.

Your lining is done!
Making the Exterior

Your bag’s exterior body panels will consist of the four layers shown above. They are, in this order, fabric, interfacing, flannel interlining and interfacing again.
Start by ironing one piece of interfacing to the wrong side of one body panel.

Then, center the flannel interlining on the wrong side of the same body panel. Layer the second sheet of fusible interfacing over the top of the flannel, matching edges to the edges of the body panel, and
carefully iron it on. This will “attach” your flannel interlining to the body panel.

Using the same method you did on the lining, make a pleat in the front (1” for cross-body bag and 2” for shoulder bag).

Again using the same method, sew the pleat in place.
Repeat the last four steps to make the panel.

With right sides together and using a ½” seam allowance, pin and sew side and bottom seams. Clip corners and press seams open.

Use the same method and mesurements you did with the lining to make 4” gussets in the bottom of the bag exterior.

Turn right side out. Decide which side will be the front and which will be the back.

Sew your button so that that the center of the button is about one inch above the bottom of the stitching on your pleat.

Find your 2” x 8” strip of fabric. Matching wrong sides along the long edge, press in half. Open up and press both long sides to the center before pressing the piece in half again.
Sew a row of stitching along both long edges, creating a tiny strap.

Fold your strap, as shown above, to create a button loop.
Secure the folded triangle at the center with several rows of stitches.

Trim your button loop so the portion above the center point measures exactly three inches.

Center the loop wrong-side-down on your bag exterior, just above the pleat and secure by zigzag stitching along the edge.
Making the Handle

Use the same method used on your bag’s exterior panels to layer fusible interfacing and interlining on the exterior handle piece.
With right sides together, pin exterior handle to handle lining and sew both long sides together, using a ½” seam allowance.

Turn handle right-side-out and press. Secure the raw edges of the handle with a simple row of stitching. (This will make it easier to pin to the bag.)
Note: We are purposely waiting to topstitch the handle. Do not topstitch it now.

With right sides together, center one end of your handle on one of your bag’s sides. Secure in place by zigzag stitching along the edge.

Repeat with the other end of the handle and the other side of your bag. You’re now ready to sew the lining and exterior together!
Attaching the Exterior and Lining

Carefully fit your bag exterior inside your lining as shown above, making sure that the side of your lining with pockets is matched up with the side of your bag exterior that has the button loop.

Match side seams and pleats and carefully pin in place. Using a ½” seam allowance, stitch around the top, joining the bag lining and bag exterior.

Remove pins and trim curves about a quarter inch from stitching.

Using the opening you left in your bag lining’s side seam, gently turn your bag right-side out. Use your hands to push the bottom corners out and carefully press around the bag opening. If you have a sleeve board (aka mini ironing board) it will come in handy here.

Starting near the point where the strap meets your bag, stitch close to the edge around the top of your bag and edges of your handles.
Finish by handstiching closed the opening in your lining seam.

Enjoy your finished bag!


Tack för alla fina mönster och instruktioner på hur man syr.
ReplyDelete